具体代码请看:NDKPractice项目的ffmpeg88livepush
1.搭建流媒体服务器
1.1 安装
在ubuntu系统中首先切换到
root用户,然后cd到lib目录下,mkdir新建nginx文件夹。使用
wget ftp://ftp.pcre.org/pub/pcre/pcre-8.38.zip下载pcre-8.38.zip版本,也可以直接下载最新的版本.- 下载下来后使用
chmod u+x pcre-8.38.zip修改权限,unzip pcre-8.38.zip解压然后进入解压的文件夹中。 - 使用
./configure运行会生成CMakeLists.txt - 接着使用
make指令执行. - 最后使用
make install指令执行.
- 下载下来后使用
下载
zlib,点击 链接 右键点击最新版本的tar.gz复制链接地址。- 返回nginx目录下使用
wget https://github.com/madler/zlib/archive/v1.2.11.tar.gz下载。 - 下载下来后使用
chmod u+x v1.2.11.tar.gz修改权限,tar -zxvf v1.2.11.tar.gz解压然后进入解压的文件夹中。 - 使用
./configure运行会生成CMakeLists.txt - 接着使用
make指令执行. - 最后使用
make install指令执行.
- 返回nginx目录下使用
下载
rtmp,点击 链接 右键点击最新版本的tar.gz复制链接地址。- 返回nginx目录下使用
wget https://github.com/arut/nginx-rtmp-module/archive/v1.2.1.tar.gz下载。 - 下载下来后使用
chmod u+x v1.2.1.tar.gz修改权限,tar -zxvf v1.2.1.tar.gz解压。这个不需要安装。
- 返回nginx目录下使用
下载
openssl,点击 链接 右键点击最新版本的tar.gz复制链接地址。- 返回nginx目录下使用
wget https://github.com/openssl/openssl/archive/OpenSSL_1_1_1c.tar.gz下载。 - 下载下来后使用
chmod u+x OpenSSL_1_1_1c.tar.gz修改权限,tar -zxvf OpenSSL_1_1_1c.tar.gz解压然后进入解压的文件夹中。 - 使用
./config --prefix=`pwd`/libs运行会生成CMakeLists.txt文件,`pwd`指令代表当前目录文件 - 接着使用
make指令执行. - 最后使用
make install指令执行.
- 返回nginx目录下使用
下载
nginx,必须依赖前面安装的所有东西 点击 链接 右键点击最新版本的tar.gz复制链接地址。- 返回nginx目录下使用
wget https://github.com/nginx/nginx/archive/release-1.17.1.tar.gz下载。 - 下载下来后使用
chmod u+x release-1.17.1.tar.gz修改权限,tar -zxvf release-1.17.1.tar.gz解压然后进入解压的文件夹中。 - 使用
./auto/configure --add-module=/lib/nginx/nginx-rtmp-module-1.2.1 --with-cc-opt="-Wimplicit-fallthrough=0" --with-openssl=/lib/nginx/openssl-OpenSSL_1_1_1c - 接着使用
make指令执行. - 最后使用
make install指令执行.
- 返回nginx目录下使用
- nginx: https://github.com/nginx/nginx/releases
- rtmp: https://github.com/arut/nginx-rtmp-module/releases
- pcre: ftp://ftp.pcre.org/pub/pcre/ 下载最新版本,这边下载 pcre-8.38.zip
- zlib: https://github.com/madler/zlib/releases
- openssl: https://github.com/openssl/openssl
出现的问题:
1 | checking for OS |
1 | nginx 执行make时出现的问题 |
1.2 配置
执行命令cp /lib/nginx/nginx-rtmp-module-1.2.1/test/nginx.conf /usr/local/nginx/conf/
替换nginx.cong。具体的可参考链接中的Example nginx.conf
类似下面这种:1
2
3
4
5
6
7
8
9
10
11
12
13
14
15
16
17
18
19
20
21
22orker_processes 1;
error_log logs/error.log debug;
events {
worker_connections 1024;
}
rtmp {
server {
listen 1935;
application myapp {
live on;
#record keyframes;
#record_path /tmp;
#record_max_size 128K;
#record_interval 30s;
#record_suffix .this.is.flv;
....
1.3 启动和停止
- 启动:
./nginx - 停止:
./nginx -s stop
常见问题:
- 端口被占用(默认8080端口)
启动错误:比如 xxx.so 找不到。
解决:
使用ldd $(which ./nginx)查看依赖包。
调用export LD_LIBRARY_PATH=/usr/local/lib:$LD_LIBRARY_PATH
1.4 测试
windows ffmpeg下载地址
mac 和 linux 类似,进入官网下载 。
下面以windows为例测试步骤:
- 进入下载好的ffmpeg解压目录的/bin目录文件夹下
- 使用命令推流:
.\ffmpeg.exe -re -i 等风来不如追风去.mp4 -vcodec libx264 -acodec aac -f flv rtmp://192.168.1.20/myapp/mystream - 使用命令拉流:
ffplay.exe rtmp://192.168.1.20/myapp/mystream
推流命令说明:
等风来不如追风去.mp4:是要推流的视频绝对路径。rtmp://192.168.1.20/myapp/mystream:要推流的地址。192.168.1.20为公网地址或局域网的地址。
2.集成 RTMP 推流源码
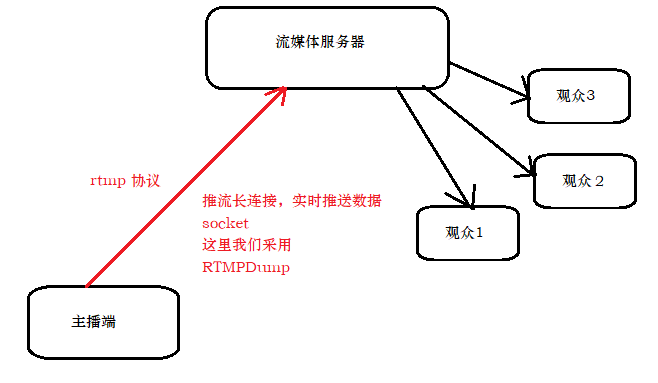
采用一种 socket 通讯方案 RTMPDump
- git clone 上面网站中的地址
git clone git://git.ffmpeg.org/rtmpdump - 将clone下来的文件夹中的librtmp目录中的所有
*.c和*.h文件拷贝到工程目录中开始开发。 - 如果出现下面的错误就在CMakeLists.txt 中添加
set(CMAKE_C_FLAGS "${CMAKE_C_FLAGS} -DNO_CRYPTO")
1 | ****\src\main\cpp\rtmp\hashswf.c:56:10: fatal error: 'openssl/ssl.h' file not found |
1 | void *threadInitConnect(void *args) { |