OpenCV:04.图像的形状绘制和卷积掩膜操作

1. inline 和 define

inline是内联函数,类似于 define 都可以做到编译时替换

区别:define 并没有严格的检测,inline函数的参数有确切的类型所以会有严格的类型检测

1
2
3
4
5
6
7
8
9
10
11
12
13
14
15
16
#define Max(a,b) a>b ? a :b 
// inline 内联函数,类似于 define 做到编译时替换
// 区别:define 并没有严格的检测,inline函数的参数有确切的类型所以会有严格的类型检测
// inline 使用场景:不涉及过于复杂的函数
inline int max1(int a, int b){
return a > b ? a : b;
}

int main(){
Mat src = imread("E:/test.jpg");

cout << max1(2, 3) << endl;

imshow("src", src);
waitKey(0);
}

2.形状和文件绘制

  • 线 line
  • 椭圆 ellipse
  • 矩形 rectangle
  • 圆 cicle
  • 填充 fillPloy
  • 文字 putText
1
2
3
4
5
6
7
8
9
10
11
12
13
14
15
16
17
18
19
20
21
22
23
24
25
26
27
28
29
30
31
32
33
34
35
36
37
38
39
40
41
42
43
44
45
46
47
48
49
50
51
52
53
54
55
56
57
58
59
60
61
62
63
64
65
int main(){
Mat src = imread("E:/test.jpg");

// 判断读取是否正确
if (src.empty()){
cout << "src read error" << endl;
return -1;
}

// 2.1 绘制线
// LINE_8: 8联通线(8-connected),即下一个点连接上一个点的边或角
// LINE_4: 下一个点和上一个点边相连(没有角了)
line(src,Point(10,10),Point(300,300),Scalar(0,0,255),5,LINE_8);

// 2.2 绘制矩形
rectangle(src, Point(20, 20), Point(100, 100), Scalar(0, 0, 255), 5, LINE_8);
rectangle(src, Rect(30,30,20,50), Scalar(0, 0, 255), 5, LINE_8);


// 2.3 绘制椭圆
// 第二个参数是:椭圆的中心点
// 第三个参数: Size 第一个值是椭圆 x width 的半径, 第二个是 y height 的半径
ellipse(src,Point(src.cols/2,src.rows/4),Size(src.cols/8,src.rows/4),180,0,360,Scalar(255,0,0),3,LINE_AA);

// 2.4 园
circle(src,Point(src.cols-500,src.rows-500),50,Scalar(0,255,255),5,LINE_AA);

// 2.5 填充 fillpoly 多边形
/*CV_EXPORTS void fillPoly(InputOutputArray img, const Point** pts,
const int* npts, int ncontours,
const Scalar& color, int lineType = LINE_8, int shift = 0,
Point offset = Point());*/
Point pots[] = { Point(100, 100), Point(100, 200), Point(200, 200), Point(100, 100) };

const Point* potss[] = { pots };

const int npts[] = { 4 };

fillPoly(src, potss, npts, 1, Scalar(255, 0, 0), LINE_8);

// 2,6 画文字
// fontFace 字体
// fontScale 缩放,大小
putText(src, "HI,OpenCV", Point(100, 100), QT_FONT_BLACK,1,Scalar(255,0,255),1,LINE_AA);

// 2.7 随机画 srand 画线
// opencv 做随机 srand random 效果一样
RNG rng(time(NULL));
// 创建一张图片,与 src 的宽高和颜色通道一直,所有的点都是 0
Mat dst = Mat::zeros(src.size(),src.type());

for (int i = 0; i < 10; i++)
{
Point sp;
sp.x = rng.uniform(0,dst.cols);
sp.y = rng.uniform(0, dst.rows);
Point ep;
ep.x = rng.uniform(0, dst.cols);
ep.y = rng.uniform(0, dst.rows);
line(dst, sp, ep, Scalar(rng.uniform(0, 255), rng.uniform(0, 255),rng.uniform(0, 255)));
}

imshow("src", dst);
waitKey(0);
}

3.图像卷积和滤波操作

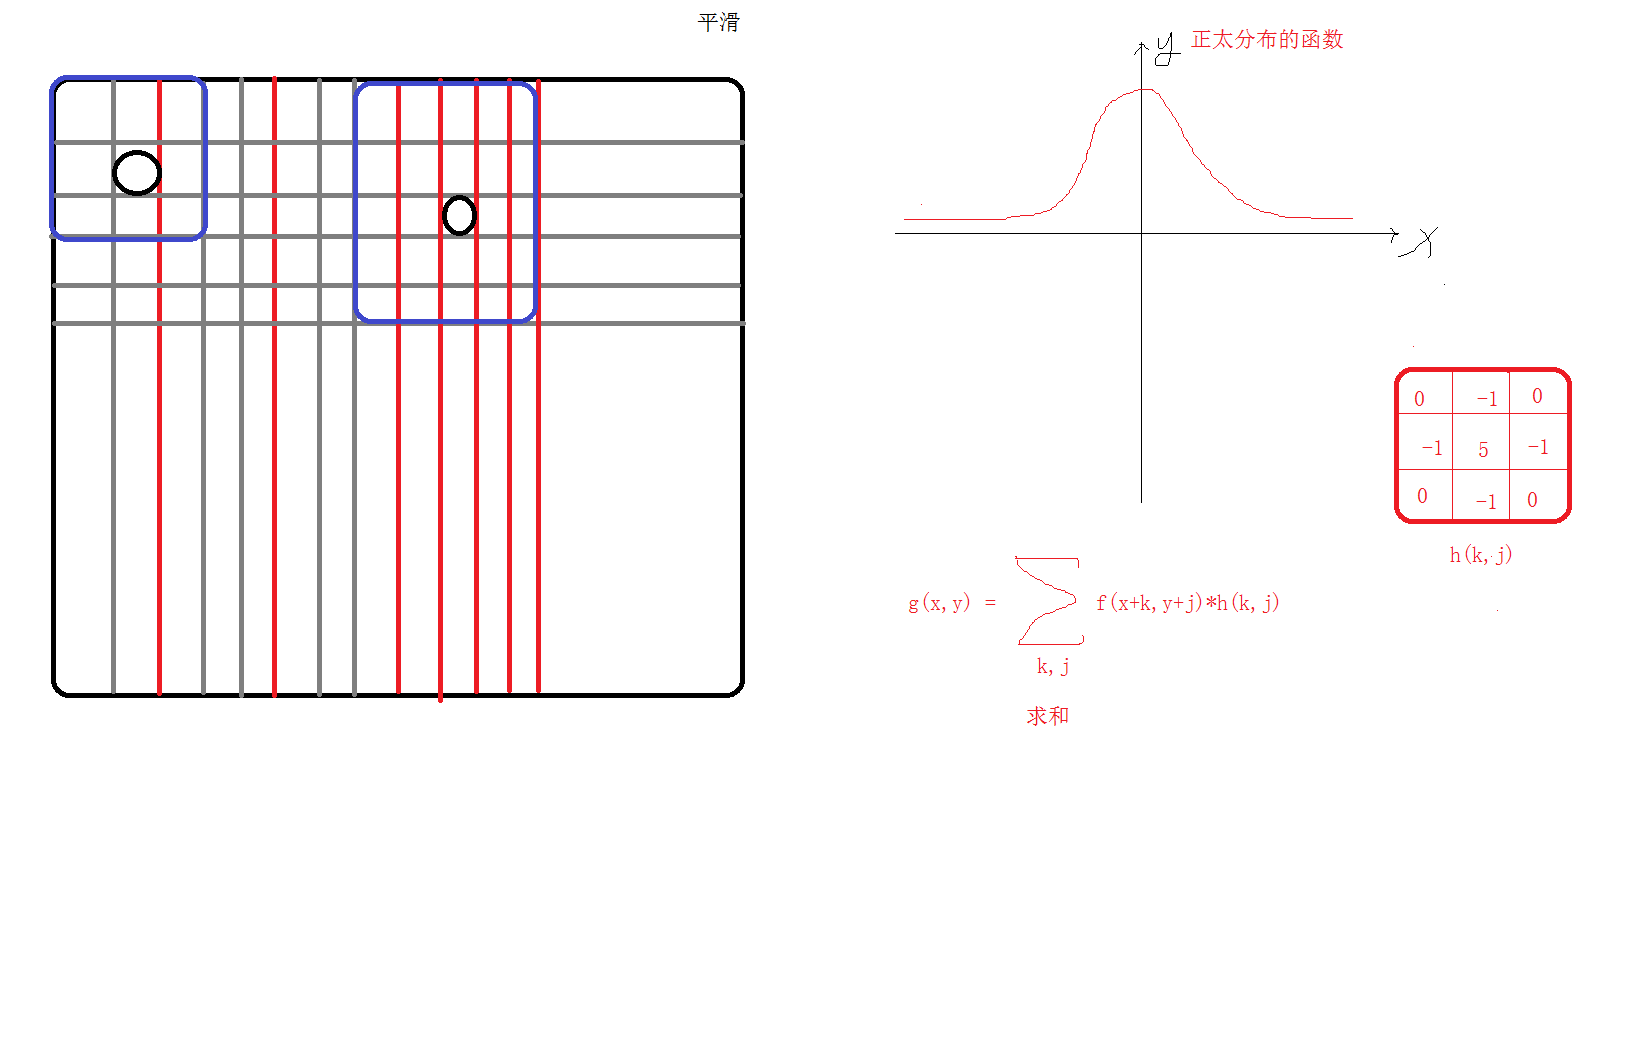
3.1 图像矩阵掩膜操作 (可以过滤图像信息)

1
2
3
4
5
6
7
8
9
10
11
12
13
14
15
16
17
18
19
20
21
22
23
24
25
26
27
28
29
30
31
32
33
34
35
36
37
38
39
int main(){
Mat src = imread("E:/copy.png");
if (src.empty()){
cout << "src read error" << endl;
return -1;
}

// 下面是掩膜操作
// 生成一个和源图像大小相等类型相同的全 0 矩阵
/*Mat dst = Mat::zeros(src.size(),src.type());
int rows = src.rows;
int cols = src.cols;
int channels = src.channels();
for (int i = 1; i < rows - 1; i++)
{
// 上一行
uchar* previous = src.ptr<uchar>(i-1);
// 当前行
uchar* current = src.ptr<uchar>(i);
// 下一行
uchar* next = src.ptr<uchar>(i+1);
// 输出
uchar* output = dst.ptr<uchar>(i);
for (int j = channels; j < (cols-1)*channels; j++)
{
output[j] = saturate_cast<uchar>(5 * current[j] - (previous[j] + next[j] + current[j - channels] + current[j + channels]));
}
}*/


// opencv 自带的掩膜操作
Mat dst;
Mat kernel = (Mat_<char>(3, 3) << 0, -1, 0, -1, 5, -1, 0, -1, 0);
filter2D(src,dst,src.depth(),kernel);

imshow("src", src);
imshow("dst", dst);
waitKey(0);
}
-------------本文结束感谢您的阅读-------------
坚持原创技术分享,您的支持将鼓励我继续创作!
0%